# Step 3: Precaching static assets for a basic offline mode
We saw in the previous step two methods of the Service Worker life cycle: install andactivate. In this part, we will continue our exploration of PWA by caching static files.
# Preamble: Promises and async/await
Service worker APIs rely heavily on promises. Let's take a quick look on how they work.
TIP
You can try the code in your browser JS console or in an online editor like repl.it (opens new window).
Promises provide an interface to handle series of asynchronous function calls more conveniently. They improve code readability compared to callbacks passed as arguments, for example. A Promise is an object that represents the result of an asynchronous operation. It can be in one of three states:
- pending: the operation is not yet completed
- fulfilled: the operation is completed successfully
- rejected: the operation failed
Once we have a Promise object, its associated code already started to execute asynchronously. We can use the then() and reject() functions to execute a function when the promises succeeds or fails (it calls. Most of the Service worker APIs provide asynchronous functions that return a Promise. For example, the fetch() function is used to make a network request and returns a promise that resolves with a Response object when the request succeeds or rejects with an error when the request fails:
const promise = fetch("http://server.api/user/yassine");
promise
  .then(function (userData) {
    // this function is called when the request is successful
    console.log(userData);
  })
  .catch(function (error) {
    // this function is called when the request failed for any reason
    console.error(error);
  });
console.log("Promise example"); // this log is shown before the other two because the promise is asynchronous
The best feature of Promises is that they can be easily chained. Inside a then callback, you can pass a function that returns another Promise in order to chain asynchronous operations:
initDatabase()
  .then(fetchAllUsers)
  .then((users) => fetchUser(users[0].id))
  .then((user) => console.log(user))
  .catch(handleFailure); // if any of the previous calls fails, catch is called
Since ES2018 specification, there is a new operator that can be used to deal with promises with a more synchronous style. Instead of chaining then calls and callbacks, we can pause the function execution while waiting for a promise result, then store the result in a variable and resume function execution. This is called awaiting the result and uses the async/await keywords. With this method, the catch method is replaced by a try/catch block, just like you are used to catch synchronous exceptions.
The following code snippet transforms the last example to use async/await.
// If we want to use await, we must be place the code in async function
async function mainAsync() {
  try {
    // wait for promise result without blocking the thread
    await initDatabase();
    const users = await fetchAllUsers();
    const user = await fetchUser(users[0].id);
    console.log(user);
  } catch (error) {
    // this catch block is executed if any promise above fails
    console.error(error);
  }
}
mainAsync(); // call the function that runs async code
console.log("Promise example with async / await");
This concludes this overview about promises and async/await. With this knowledge acquired, we can use the caching APIs of the service worker more serenely.
If you still feel uncomfortable with promises, here are some exercices: set 1 (opens new window), set 2 (opens new window), set 3 (opens new window)
# Exploring caching APIs
Of the APIs that the Service Worker has access to (opens new window), the one we are interested in is Cache API (opens new window). Indeed, it makes it possible to put in a persistent cache the requests/responses pairs with the method cache.put(request, response). It is also possible to pass one or more URLs as arguments to the cache.add and cache.addAll methods; they will be requested and the network response will be added to the cache. You can also delete cache entries with the cache.delete method.
The different caches are accessible through the caches variable from the Service Worker. It is the CacheStorage API (opens new window) which allows, among other things, to create / retrieve a cache object or to delete one with the caches.open and caches.delete functions.
Finally, another interesting method of the cache is match: it checks in all Cache objects managed by the CacheStorage if a request is identical to that passed in parameter. If so, it returns a Promise resolved with the cached response.
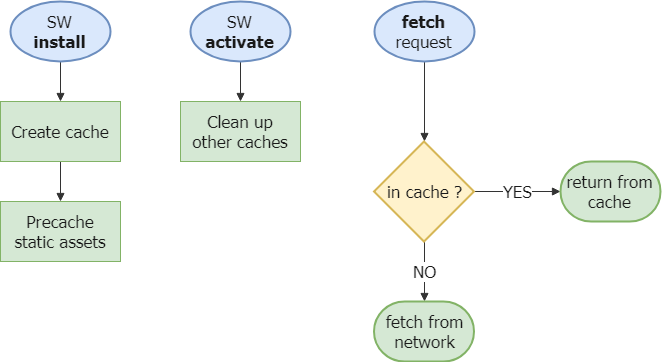
# Precaching critical static files
We will cache the essential static files of the application as soon as possible. The best timing to do this is when the install event is triggered, because it is only called once at Service Worker installation. This is called precaching.
- Go to
sw.jsin theinstallevent callback as seen in step 2. - Open the cache with
caches.open('V1')(opens new window), which returns a Promise resolved with thecacheobject. The version number in the cache name will be useful for future updates. - Once the cache is open, add to the cache with
cache.addAll(['url1', 'url2', ...])(opens new window). the URLs to the essential static files of our application: the root HTML page, thestyles.cssfile and thescripts.jsfile. - In order for the Service Worker to activate after precaching is complete, pass the
Promisereturned bycache.addAllas an argument toevent.waitUntil ()(opens new window),eventbeing the installation event.
See the solution
const CACHE_NAME = "V1";
const STATIC_CACHE_URLS = ["/", "styles.css", "scripts.js"];

self.addEventListener("install", (event) => {
  console.log("Service Worker installing.");
  event.waitUntil(
    caches.open(CACHE_NAME).then((cache) => cache.addAll(STATIC_CACHE_URLS))
  );
});
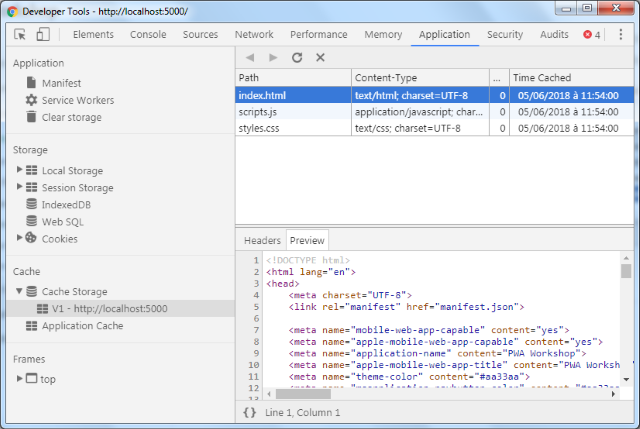
Reload the page and the Service Worker, making sure that the new version of the Service Worker replaces the old one as seen in step 2. We can then check that the files are added to the cache by looking at the Cache Storage section in the Application tab of Chrome Developer Tools.
# Response with cache in priority
Now that the files are cached, we have to indicate to use their cached version when the browser requests them. To do this, we will use the fetch event. The latter intercepts all requests made by clients who have installed the Service Worker. You can then return a custom response with event.respondWith, where event is the FetchEvent (opens new window). The event.respondWith (opens new window) function takes as a single argument a Promise that must be resolved with the response to return.
self.addEventListener("fetch", (event) => {
  console.log(`Request of ${event.request.url}`);

  // default behaviour: request the network
  event.respondWith(fetch(event.request));
});
We want to change the default behavior and return previously cached versions if they exist. Precisely, the caches.match (opens new window) function returns a Promise resolved with aResponse object, just like fetch (event.request). So we can replace one by the other and return the static files from cache instead of requesting them from the network.
- Add a callback for the
fetchevent, the same way you did forinstallin the previous step. - Call the
caches.match(event.request)method to search the cache for a cached response for the corresponding request. - If no cache entry is found, the Promise is resolved with the value
undefined. In this case, you need to request the network and returnfetch(event.request)instead. - Finally, return this Promise of Response to the client request by passing it as argument to
event.respondWith()
See the solution
self.addEventListener("fetch", (event) => {
  // Cache-First Strategy
  event.respondWith(
    caches
      .match(event.request) // check if the request has already been cached
      .then((cached) => cached || fetch(event.request)) // otherwise request network
  );
});
# Testing offline
If everything has been done correctly, you should now be able to test the application in offline mode. Shut down your local server and try to reload the application. The cached page should be displayed.
# Put files in cache automatically
When offline, some non-essential static files can not be downloaded and have not been put in cache ; for example, the PWA logo in the header. Let's change our service worker code to put these files in cache automatically, without using precaching at install.
- Add this
cachefunction below in the Service Worker code:
function cache(request, response) {
  if (response.type === "error" || response.type === "opaque") {
    return Promise.resolve(); // do not put in cache network errors
  }

  return caches
    .open(CACHE_NAME)
    .then((cache) => cache.put(request, response.clone()));
}
Warning
An answer can only be read once, so it must be cloned with the .clone() method before caching it.
In
fetchevent callback, add anothertheninstruction after fetching network, then call the functioncachedeclared before with the request and its response to put them in cache.Add one last
theninstruction to make sure the promise resolves with the network response as final value, as required by theevent.respondWithfunction.
See the solution
self.addEventListener("fetch", (event) => {
  // Cache-First Strategy
  event.respondWith(
    caches
      .match(event.request) // check if the request has already been cached
      .then((cached) => cached || fetch(event.request)) // otherwise request network
      .then(
        (response) =>
          cache(event.request, response) // put response in cache
            .then(() => response) // resolve promise with the network response
      )
  );
});
To test automatic cache, go back online and reload the app to put in cache the PWA logo. Check with the DevTools that it is correctly added to the cache, then go back offline and try to load this logo without any Internet connection.
TIP
Files loaded from an external domain that does not allow CORS requests, like the attendees pictures taken from Amazon and the font taken from Google, cannot be put in cache like the other static files. You will have to host these files on your domain or configure CORS on the external domain to be allowed to cache those.
# Cache updates
Caching static files raises a question: what happens if I add, delete, or modify these files on the server ?
As we have currently coded our Service Worker, we will always load the cached files, so new versions deployed on the server will never be used.
To handle this problem, one solution is to use a new cache with another name. The idea here would be to create a new V2 cache that contains the new files and remove the previous obsolete cache.
- In the
installevent callback, change the cache name toV2 - In the
activateevent callback, delete the old cache withcaches.delete('V1') - Pass the
Promisereturned bycaches.deleteinevent.waitUntilin order to wait for the cache to be removed before the end of the activation step - (optional) - Improve your cache cleanup code by removing all caches that are not in your whitelist of used caches. You can browse all existing caches with the
caches.keys()method
See the solution
const CACHE_NAME = "V2";

self.addEventListener("activate", (event) => {
  // delete any unexpected caches
  event.waitUntil(
    caches
      .keys()
      .then((keys) => keys.filter((key) => key !== CACHE_NAME))
      .then((keys) =>
        Promise.all(
          keys.map((key) => {
            console.log(`Deleting cache ${key}`);
            return caches.delete(key);
          })
        )
      )
  );
});